Experience Bakery-Quality at Home: Easy No-Knead Dutch Oven Garlic Herb Bread
Imagine the irresistible aroma of freshly baked bread wafting through your kitchen – a scent usually reserved for the finest bakeries. Now, imagine achieving that magic with minimal effort, thanks to the ingenious combination of a no-knead technique and the humble Dutch oven. This isn't just any bread; it's a rustic, deeply flavorful garlic herb bread with an incredibly crisp crust and a tender, airy crumb. Forget the fuss and complexity often associated with homemade bread; this recipe brings sophisticated flavor and texture right to your table, making every meal feel like a special occasion.
Many home bakers shy away from bread making, intimidated by the kneading process or the pursuit of that elusive perfect crust. But what if we told you that the secret to a professional-grade loaf lies in patience, not muscle? This recipe leverages a long, slow fermentation and the unique environment of a Dutch oven to deliver a loaf that will astound you with its simplicity and exquisite results. It's truly a game-changer for anyone who loves the idea of fresh bread but dreads the work.
The Genius Behind No-Knead Dutch Oven Bread
The magic of this garlic herb bread starts with two fundamental principles: the no-knead method and the power of the Dutch oven. Understanding why these elements work together so beautifully is key to appreciating the simplicity and success of the recipe.
The No-Knead Revolution: Traditional bread recipes demand vigorous kneading to develop gluten, the protein network that gives bread its structure and chew. The no-knead method, however, lets time do the heavy lifting. By allowing a wet, shaggy dough to rest for 12 to 18 hours, the gluten strands naturally align and strengthen themselves through a process called autolysis. This extended fermentation doesn't just build structure; it also deepens the flavor profile of the bread. Yeast has more time to consume sugars and produce complex aromatic compounds, resulting in a more nuanced and delicious loaf. It truly takes the effort out of bread making, allowing you to prepare the dough in minutes and let it transform overnight. For a deeper dive into the science and benefits of this resting period, check out our article on Effortless Aroma: Overnight Rest for Amazing Garlic Herb Bread.
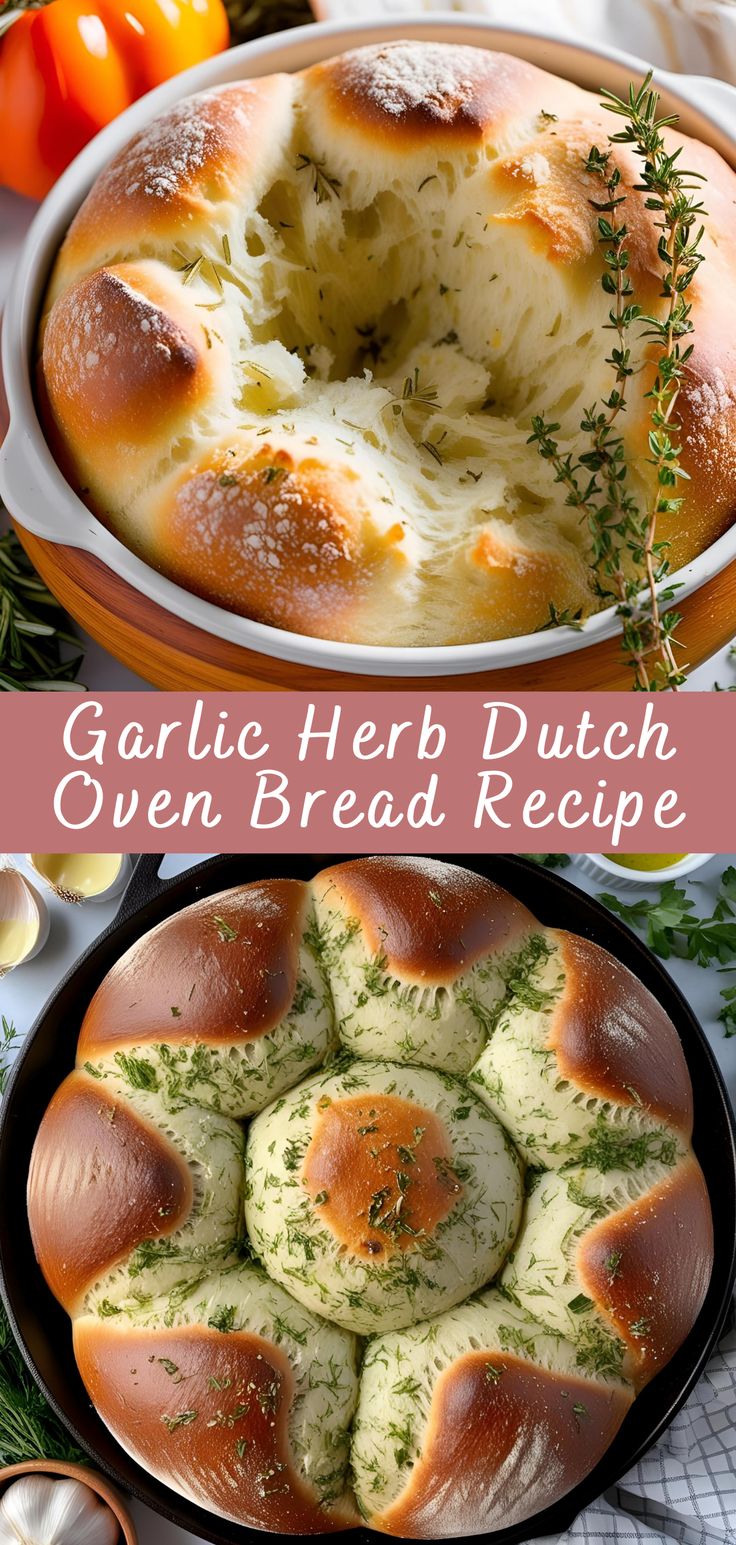
The Dutch Oven Advantage: Once your dough is perfectly proofed, the Dutch oven steps in to create that coveted bakery-quality crust. By preheating the heavy pot inside your oven, you create an incredibly hot environment that mimics a professional bread oven. When the dough is carefully transferred to the searing hot Dutch oven and covered, the trapped moisture from the dough creates steam. This steam is crucial: it keeps the crust pliable for the first critical minutes of baking, allowing the loaf to expand fully without tearing. Once the lid is removed, the intense dry heat finishes the job, yielding a thick, golden-brown crust that crackles with every slice, while keeping the interior incredibly soft and moist. It's this combination of sustained high heat and initial steam that separates a good homemade loaf from a truly exceptional one.
Crafting Your Perfect Garlic Herb Bread: Beyond the Basics
While the beauty of this garlic herb bread lies in its simplicity, a few considerations can elevate your loaf from great to extraordinary. Selecting quality ingredients and understanding their roles is paramount.
- Flour Power: 3 cups of all-purpose flour form the sturdy foundation. While any good quality all-purpose flour will work, experimenting with unbleached varieties or even a small portion of whole wheat flour can add depth. Accuracy in measuring flour is crucial; weighing it is always best, but if using cups, spoon the flour into the measuring cup and level it off rather than scooping directly from the bag.
- Yeast & Water: 1/2 teaspoon of instant yeast works its magic gently over the long rest. If you only have active dry yeast, you can still use it by proofing it first in a portion of the 1 1/2 cups of warm water (around 105-115°F or 40-46°C) with a pinch of sugar for 5-10 minutes until foamy. The warm water itself is vital for hydrating the flour and activating the yeast, contributing to that soft, open crumb.
- Garlic & Herbs: This is where the flavor truly shines! 4 cloves of freshly minced garlic are non-negotiable. Fresh garlic permeates the dough with a bright, pungent aroma that dried garlic simply cannot replicate. For herbs, 2 tablespoons of fresh rosemary and thyme, finely chopped, infuse the bread with fragrant earthiness. While dried herbs can be used in a pinch (use about half the amount), fresh truly makes a difference. Consider adding other fresh herbs like oregano or parsley for additional layers of flavor.
- Olive Oil: 1 tablespoon of good quality extra virgin olive oil not only prevents sticking but also imparts a subtle richness and aromatic depth. Its fruity notes complement the garlic and herbs beautifully.
- Salt: Don't underestimate the 1 1/2 teaspoons of salt. It's not just for seasoning; salt also plays a vital role in regulating yeast activity and strengthening gluten structure, contributing to both flavor and texture.
Pro-Tip for Flavor Enhancement: While this recipe is fantastic as is, don't hesitate to personalize it. For an extra layer of savory goodness, consider folding in a handful of grated Parmesan cheese or a pinch of red pepper flakes with your herbs. This can transform your rustic loaf into something even more exciting, reminiscent of those irresistible Twist Up Your Snack Game: Spicy Garlic Herb Parmesan Bread, perfect for dipping!
Step-by-Step Simplicity: From Bowl to Bakery Loaf
The beauty of this garlic herb bread is that the "instructions" are less about complex techniques and more about precise timing and observation. Here's how to bring your masterpiece to life:
- Build the Flavor Base: In a generously sized bowl, thoroughly whisk together your dry ingredients: the all-purpose flour, salt, and instant yeast. Ensuring an even distribution now guarantees consistent rise and seasoning throughout your finished loaf.
- Combine Wet & Dry: Pour in the warm water, then add your freshly minced garlic and finely chopped herbs. Stir everything together with a sturdy spoon or spatula until all the flour is hydrated and you have a wet, shaggy, and seemingly messy dough. Resist the urge to overmix; just ensure everything is well combined.
- The Long Rest (Where the Magic Happens): Cover your bowl tightly with plastic wrap or a clean kitchen towel. Now, let time work its wonders! Leave the dough at room temperature (ideally between 68-75°F or 20-24°C) for a generous 12 to 18 hours. This extended, slow fermentation is crucial for developing the complex flavors and superior texture that define this no-knead bread.
- Preheat the Dutch Oven: About 30 minutes before you're ready to bake, place your empty Dutch oven with its lid inside your cold oven. Preheat the oven to a scorching 450°F (232°C). Allowing the Dutch oven to get screaming hot is the secret to achieving that wonderfully crispy crust.
- Prepare the Dough for Baking: Liberally sprinkle a clean counter or a large piece of parchment paper with flour. Gently scrape the rested dough out onto the floured surface. The dough will be sticky and bubbly. Using floured hands, gently fold the edges of the dough towards the center a few times, shaping it loosely into a round ball. Avoid overworking it; we want to preserve those precious air bubbles. If using parchment, you can lift it directly into the pot. If not, carefully lift the dough and lower it into the preheated Dutch oven.
- Bake to Perfection: Cover the Dutch oven with its hot lid and bake for 30 minutes. The trapped steam will work its magic. After 30 minutes, carefully remove the lid and continue baking for another 15-20 minutes, or until the crust is a deep, golden brown and sounds hollow when tapped.
- Cool & Enjoy: This step is critical! Immediately transfer the baked bread from the Dutch oven to a wire rack to cool completely. Slicing into warm bread can release steam too quickly, leading to a gummy texture. Patience will be rewarded with the perfect crumb.
Elevating Your Garlic Herb Bread Experience
Once your aromatic garlic herb bread has cooled to perfection, the possibilities are endless. This isn't just a side dish; it's a star in its own right.
Serving Suggestions:
- Dunk-worthy Delight: Serve warm slices with a simple bowl of good quality olive oil for dipping, perhaps infused with a little more garlic or balsamic vinegar. It's also heavenly alongside a rich marinara sauce, perfect for satisfying those "dunk-alicious" cravings.
- Soup & Stew Companion: Its rustic charm and robust flavor make it the ultimate accompaniment to hearty soups, stews, or chili. The crust is perfect for soaking up every last drop.
- The Ultimate Sandwich Base: Slice thick and use it for gourmet sandwiches, perhaps with roasted vegetables, fresh mozzarella, or deli meats.
- Bruschetta Base: Toast slices lightly, rub with a raw garlic clove, drizzle with olive oil, and top with fresh tomatoes and basil for an elevated appetizer.
- With Dinner: This bread is the ideal partner for pasta dishes, grilled chicken, or a simple steak, adding an aromatic, comforting element to any meal.
Storage & Reheating:
Store your cooled garlic herb bread at room temperature in an airtight container or a paper bag for up to 2-3 days. Avoid refrigerating, as it can dry out the bread. To revive, simply spritz lightly with water and reheat in a 350°F (175°C) oven for 10-15 minutes, or toast individual slices.
Flavor Variations:
Don't stop at rosemary and thyme! Get creative with your herbs:
- Cheesy Goodness: Fold in 1/2 cup of shredded Parmesan, sharp cheddar, or Gruyere cheese when you add the wet ingredients.
- Mediterranean Twist: Add chopped Kalamata olives, sun-dried tomatoes, or crumbled feta.
- Spicy Kick: A pinch of red pepper flakes adds a delightful warmth.
- Lemon Zest: A tablespoon of fresh lemon zest can brighten the flavor profile beautifully.
This easy no-knead Dutch oven garlic herb bread is more than just a recipe; it's an invitation to experience the joy of baking artisan-quality bread in your own home with minimal effort. The irresistible aroma that fills your kitchen, the satisfying crunch of the crust, and the tender, flavorful crumb will make you wonder why you ever bought bread again. Give it a try, and prepare to impress yourself and everyone lucky enough to share a slice.
